After you’ve taken photos of a property you can post-process and edit the photos with a variety of software programs. In this real estate photography tip we’ll look at what software I use to blend my bracketed shots together to deliver the final product.
Real Estate Photography Tutorial – File Management – Start to Finish
Real Estate Photography Tutorial – Prep and Settings
Real Estate Photography Tutorial – Shot List and Guide
Real Estate Photography Tutorial – Software Setup for Post Processing (you are here)
Real Estate Photography Tutorial – Editing With Lightroom And Enfuse/HDR
Adobe Photoshop Lightroom
I spend 98% of my time in Adobe Photoshop Lightroom ($104.52 on Amazon.com) when post-processing real estate photos. You could actually get away with only using Lightroom and nothing else, depending on the quality level of the final result you are seeking. Usually the only time I jump outside Lightroom is when I need to replace a sky so if you wanted to leave a white sky in a photo, you could complete everything necessary in Lightroom itself.
Adobe has switched to a monthly subscription model with their photo editing software, called Creative Cloud. One of the benefits of this model is the low entry-fee to start using some of their most powerful software programs. In the past you had to buy each program separately. Lightroom would run you ~$100, and if you wanted to purchase Photoshop you would be in the hole an additional $600-$700. For the real estate photographer just starting their business, that can be a big expense hit to their wallet.
As of this writing, Adobe is offering a Creative Cloud membership to their Photoshop Photography Program for $9.99/month. They claim it’s a a limited-time only offer, but if I recall correctly I think they keep extending the deadline. A subscription to this program gets you full access to Lightroom 5 and Photoshop CC, including all future updates. You really can’t beat it, having the latest versions of the software and not to mention a full-fledged Photoshop application.
Lightroom Metadata
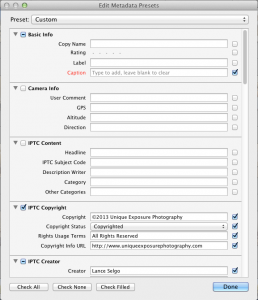
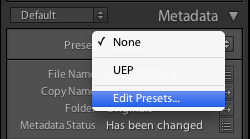 Before we start to edit our first photo shoot, let’s take a look at some of the things we can set up in Lightroom to make the editing process easier. Open up Lightroom and create a new catalog if you don’t have one created already. Make sure you have selected the Library module in the top, and on the right-hand side find the Metadata section. Click on the Preset drop-down box, and select Edit Presets… We are going to modify some key pieces of metadata and save it as a preset so when we import our photos, we can automatically apply copyright information to each photo.
Of the available sections and pieces of data, here are some that I would recommend filling out:
Copyright (©<current year> Your Company Name)
Copyright Status (Copyrighted)
Rights Usage Terms (All Rights Reserved)
Copyright Info URL (Your website URL or a direct link to a copyright statement)
IPTC Creator
Creator
Creator Address
Creator City
Creator State / Province
Creator Postal Code
Creator Phone
Creator E-Mail
Creator Website
You are more than welcome to fill out additional pieces of data, but I am comfortable with filling out the above to make sure my photos are stamped with my information.
Once you have everything filled out, click on the Preset drop-down box at the top that currently says Custom, and select Save Current Settings as New Preset… Give it a name, click Create, then click Done.
Lightroom Auto Lens Corrections
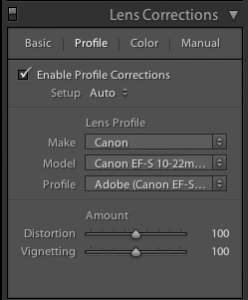 If you don’t have any images in your current catalog, import a RAW photo from your camera. Click on the photo, and go into the Develop module by clicking Develop at the top. (If you made prior adjustments to this particular photo, scroll down on the right-hand side and select Reset to remove your adjustments.) In the right-hand side, scroll down to Lens Corrections. Of the four tabs within this section, click on the Profile section. Select the Enable Profile Corrections checkbox, and make sure Setup is set to Auto as displayed in the screenshot.
Lightroom has built-in lens correction profiles for various camera and lens combinations. You should see your lens pop up under the Lens Profile section. Lightroom will automatically correct minor distortions and vignetting caused by your particular lens. It’s not a major correction, but it’s best to start off on the right foot before we blend our photos together so we’ll be applying this correction to all of our photos during the import process.
The only adjustment that we’ve made to the current photo is the Auto Profile Corrections. We need to save this setting as a preset so we can apply it to our imported photos. Switching to the left-hand side, find the Presets section and click on the plus-sign. Give your preset a new name, hit the Check All button at the bottom so all of the adjustments are saved in this preset, and hit the Create button.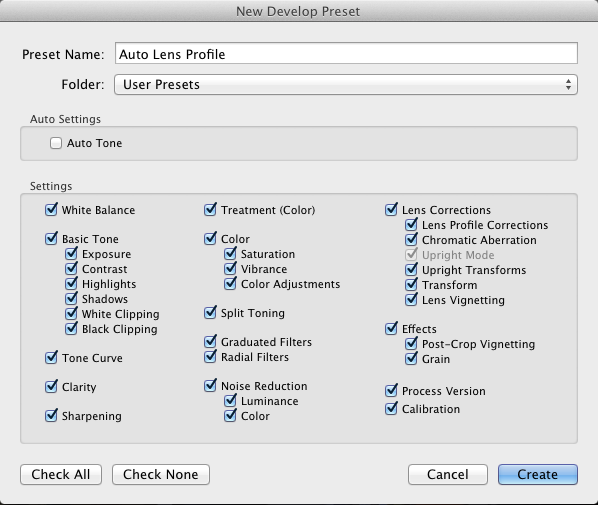
Lightroom Enfuse Plugin (LR/Enfuse)
Back in the Shot Taking phase we discussed bracketed shooting and coming home with 7 bracketed exposures of each shot. We will use an algorithm/program called Enfuse to blend them together. Enfuse is similar to HDR in that multiple exposures are blended together to result in a single image. However with HDR, you create an HDR image and then you have to tonemap that image. Enfuse blends everything together and doesn’t require tonemapping, and I find you end up with a more natural result.
To make our job easier, we are going to utilize a plugin for Lightroom called LR/Enfuse that will blend our photos together. Head on over to the Photographer’s Toolbox website to Download LR/Enfuse. The plugin is donationware so donate some funds to the author to unlock all capabilities of the plugin.
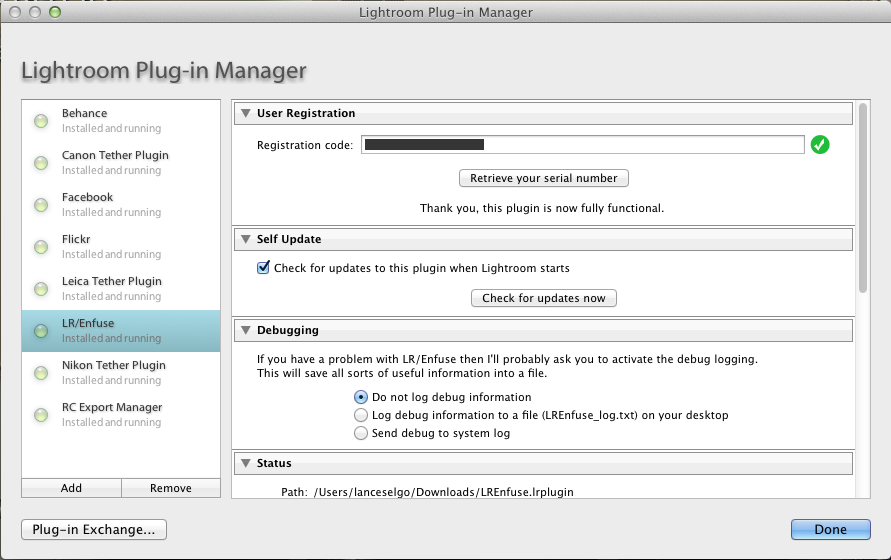
Unzip the downloaded file to end up with a .lrplugin file. Head to Lightroom and go to File->Plug-in Manager… Click on the Add button in the bottom left and find the Enfuse .lrplugin file you just extracted.
Lightroom Export Settings
We are almost finished with adjusting Lightroom settings! The last step is creating some export presets. Most real estate photographers deliver two sets of photos: Full and Small/Compressed. Realtors can use the full size photos for print material, and they can use the small size photos for uploading to MLS, sharing on social media sites, sending through email and posting to their website. If you haven’t noticed, I’m all about setting up systems or ways to make it easy to duplicate a process over multiple photo shoots.
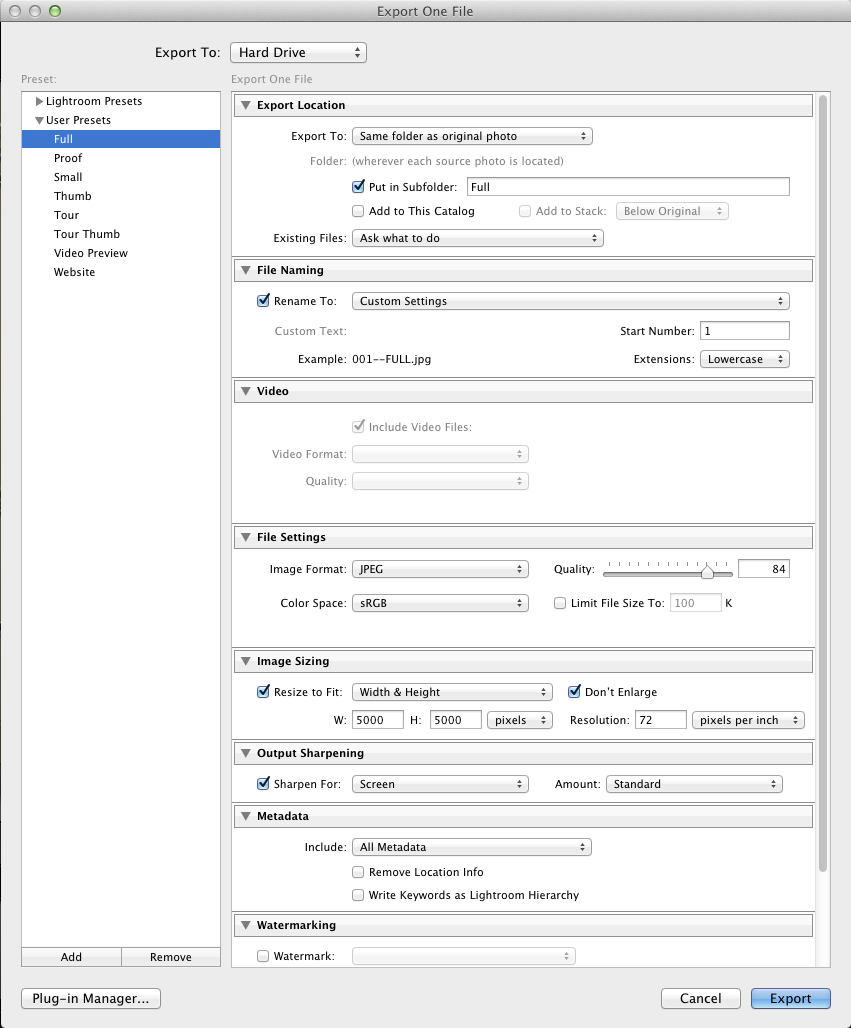
With a photo selected, head up to File->Export… In the left-hand side Preset window, click the Add button and give your preset a name of “Full”, followed by hitting the Create button. With the Full preset selected on the left-hand side, make sure Hard Drive is selected in the drop-down box at the top for Export To. Fill out the various sections according to the screenshot attached below:
Export Location
Export To: Same folder as original photo
Put in Subfolder: Full
File Naming
Start Number: 1
(Although the preview name of 001–FULL.jpg doesn’t look too good right now, before we go to export we’ll adjust the Title of the photo so the name will resemble the property address where we took the photo.)
File Settings
JPEG, Quality 84
Image Sizing
You can set this up as you wish. My current settings constrain the photo so the longest side is not longer than 5000 pixels, and the photo will not be enlarged to meet a size requirement. If you shoot high resolution and want to deliver photos over 5000 pixels, just leave this section unchecked.
Output Sharpening
I set it to sharpen for screen usage, at the standard level.
Before you hit cancel, right click on Full in the preset menu on the left, and click on Update With Current Settings to save your adjustments to the Full preset.
Repeat the above process to create a Small preset. Every field that says “Full”, change it to “Small”. And don’t forget to adjust your Image Sizing. I force my small photos to fit inside an 800 x 600 box but you are free to set it to whatever you think is best for your clients.
Again, don’t forget to right click on Small in the preset menu on the left, and click on Update With Current Settings to save your adjustments to the Small preset.
You are officially prepared to edit a real estate photography shoot. If you haven’t, go take some exterior/interior photos because the next tutorial is going to dive right in to processing with Lightroom and Photoshop!
Hi Lance,
Curious on your “full” settings as to why you have set the output resolution to 72 dpi? You mention that the full set is intended if the Realtor wants to use it for print collateral. Why do you not output at a higher dpi (ie 150, 240 default LR or 300)? Small makes perfect sense as 72 is screen resolution, it’s intended use.
Thanks, learning lots already.
Derek
Hi Derek,
The resolution DPI doesn’t matter. DPI only comes into play when printing. Regardless of what you set DPI at, your image will export with the same height/width in pixels. DPI is the measure of how many pixels are crammed into an inch square when printing, and has no affect on the actual image size or pixel resolution. (You can see what I mean by exporting the same image twice. Do it at 72dpi, then at 300dpi. The resolution in pixels and file sizes will be exactly the same.)
Hi Derek,
I just wonder why my LR/Enfuse exports in 150 DPI only, I can not figure it out how to change it and it’s not enough for some of my clients.
Or maybe I do something wrong? I shoot in highest resolution (RAW).
I have been exporting my real estate photos for MLS to realtors using “dimensions” 1800×1200 pixels in LR5. The MLS system compresses them to 640×480 pixels. Once the images are on MLS they do not look good. I have tried exporting them from Lightroom as 640×480 files but the realtors come back saying the files are too small to upload onto MLS. I just want my images to look sharp on MLS, my full resolution images look great. I’m so confused as to what I’m doing wrong.
Hi Debbie,
Yes that’s definitely an issue that we need to deal with when sending agents our photos! MLS will definitely compress, and the less they compress, the better the result. My advice is to get a client who you are close with, someone that either does a lot of business with you or someone who you know will be open to a little bit of testing. Have them upload maybe 20 photos like regular, but then have them upload 5 with your new smaller resolution (640×480). Compare the images on MLS, and make adjustments where needed.
Once you have the results from that test, you will be more confident to tell your agents that no, the photos aren’t too small, and they will look better once posted with the correct size. (During your testing, take some screen shots from online MLS sites to prove your point as a comparison!)
Good luck!
I watched your video and saw how you stacked and then processed your multi-image sets in Enfuse. I’ve been told that other RE photographers favor Enfuse over the other HDR software packages such as Photomatix and HDR Efex Pro 2. Why do you favor Enfuse? Do you believe that it produces a more natural final result for interior real estate photos than the other software programs? Or is it that it is easier to use and cheaper than the others?
Hi Roland! Yes a lot of RE photogs use Enfuse because of the more natural look. You can obtain the same look with Photomatix I believe, I just haven’t used it enough to know how. I also like how Enfuse is seamlessly integrated into Lightroom when you use the plugin. You don’t have to jump out to another program, etc. It makes for really quick, fast editing.
Cost is 0% of the factor. Running a real estate photography business, a couple hundred bucks for whatever main software you use is totally worth it, so I wouldn’t figure cost into the equation at all. The important thing is using the software that gets you the result you want, and that you are comfortable using.
Lance,
I love this workflow and have already started implementing it. However, I’m running to a problem when exporting using the small preset. I have everything set as you instructed, but the images are 800×532 instead of 800×600.
After a few searches online, I found a couple of discussions where it was mentioned that unless your images have a 4:3 aspect ratio before exporting, Lightroom can’t export them to 800×600.
Have you had any issues like this? What is the aspect ratio of your images straight out of your camera?
Interestingly enough, I went back to Lightroom and was going to crop an image to 4:3 to test exporting, but Lightroom doesn’t have a 4:3 crop preset. So I created a custom one and cropped an image and exported it using the Small preset, and it worked…the image was indeed resized to 800×600 on export.
Just wondering if I’m the only one having this problem? Surely not! Ha!
Thanks,
Jake
Nope nothing is wrong with your Lightroom Jake. I actually just sent you an email about it and I mistakingly said 3:2, but you are correct, 4:3!
When you export in Lightroom, you are telling Lightroom to fit your image into that desired window. It doesn’t alter the ratio of the actual file, however. So it squeezes your photo into 800×600, while maintaining ratio, which is why you end up with an 800x53X image.
You are exactly right, in that if you crop your photos first to a 4:3 ratio, the export will work as expected and result in an 800×600 photo.
I’ve done a little experimenting with uploading different sized photos to my local MLS (via an agent I work with) and the quality is best when I upload images that precisely fit their window. In my case is 767 pixels wide with no reasonable restriction on height that I have encountered. A quick way to check dimensions is to download a random sample of images from the MLS (not Trulia, Zillow or realtor.com) and inspect the pixel dimensions with Photoshop, GraphicConverter or your favorite image editor. MLS’s are notorious for giving out incorrect information on image sizes. If the MLS software does any resizing, it’s bad news.
Good tip Ken about downloading from local MLS! It’s easy for an agent to create an MLS sheet/link to send to clients, and the photos are attached. Would be simple to download/save a photo and check its dimensions. Love that tip.
I had a question but think I answered it. How can you set Lightroom to resize and always keep the width 767 when you have both landscape and portrait RE photos? I used the “Width & Height” option with 767 being the width and 1200 for the height. I tested both a portrait and landscape photo and both had a width of 767. The key is to have the height over 1023 pixels (at least for my 4:3 aspect ratio). My final portrait was 767 x 1023. Hope that helps someone with the same question.
Good observation and thanks for sharing Jeff!
Hi Lance, Firstly I would like to say a BIG thank you for freely sharing your tutorials. They are greatly appreciated and will save me a lot of editing time 🙂
I am following your setup for exporting from Lightroom but I cannot find an option of ‘Custom Settings’ in the ‘File Naming’ drop down menu. Can you please tell me how you got these settings? If I change it to ‘Custom Setting’ using ‘edit’ the file name example I get is has ‘custom setting.jpg, instead of ‘Full.jpg’ in your example.
Thanks in advance. Julie
Hi Julie! Will look into this later today and follow back up with some info. 🙂
Hi Julie,
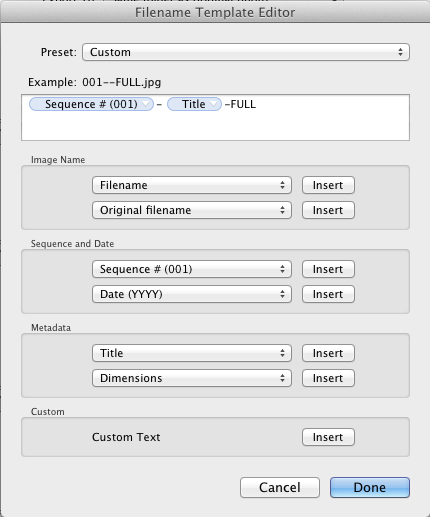
The “Custom Settings” option will automatically show up after you edit the renaming portion to what you want. So from the Export window, find the Rename To: section and in that drop-down, choose Edit… When the window pops up, clear out the top text box area if there is anything currently there. Then under the Sequence and Date section, select Sequence # (001) from the first drop-down. It should automatically populate the top box with Sequence # (001) in blue. If it doesn’t, go ahead and click the Insert button.
Now add a dash (-) into the text box.
Then under the Metadata section, in the first drop-down select Title. Again it should auto populate the top text area with Title in blue, but if not, select Insert.
Add another dash (-), then type FULL or SMALL or whatever additional text you want at the end.
Once you hit Done, the Rename To: box should now say Custom Settings. You can then either click the plus sign on the left to add a new custom preset with your current settings, or if you already have a preset created, simply right click on it and choose Update with Current Settings.
Good luck!
You lost me at the setting the Preset Auto Lens Correct “”The only adjustment that we’ve made to the current photo is the Auto Profile Corrections. We need to save this setting as a preset so we can apply it to our imported photos. Switching to the left-hand side, find the Presets section and click on the plus-sign. Give your preset a new name, hit the Check All button at the bottom so all of the adjustments are saved in this preset, and hit the Create button.” Why would I be hiting “check all” when Im just doing this for the lens correction and other settings could change for different photos?
Thank you
You can select only the specific adjustments that you want to save for that preset, but the difference is irrelevant. Because you are only going to be saving adjustments that you actually make. So if all you only make an adjustment to the crop for instance, only that adjustment will be saved in your preset regardless if all of the adjustment boxes are selected when creating the preset. I select all of them to make sure all of the adjustments I made are transferred to the preset.
Hi Lance,
This is about setting up auto lens correction. My old workflow I would select my toned photo then click on the basic tab check constrain crop and click auto. All the vertical lines would snap o straight. Following you tutorial, I select a photo and go to Develop module then click on the Profile tab and check enable profile corrections go to the setup and select Auto and go to Nikon. As soon as I do that it reverts back to custom and the is no change. Also, I’ve created a preset with that setting but am at a loss as to what I’m doing wrong. I imported a set of brackets but no corrections that I can see.
Where am I going wrong?
Got it thank you.
Regarding the lens correction issue… I just realized that it all happens after you select the preset in “Apply during import”… Correct?
Yes that’s correct Kraig. When I import, I select “Auto Lens Profile” for Develop Settings, and “UEP” for Metadata, under Apply During Import. The Lens Profile will then automatically be applied based off that preset I created earlier, and my company’s copyright info, etc will be applied to Metadata. If you don’t do it during import, you should be able to go into Develop module, select all of your photos, make sure sync is set to Auto Sync in the bottom right, and then apply the preset. In my case, the changes aren’t too drastic. It takes out a little bit of spherical distortion and adjusts the vignetting a bit. I think that’s mostly it though. It will depend on how wide your lens is and how much it thinks it needs to correct based off that lens.
When you import with that setting applied during import, it should say Auto there under Profile. The moment you change that setting manually, it’ll switch to Custom. Does that answer your Q Kraig?
Hi Lance,
Love the software, but I’m struggling with some ugly color casts.
I’m spending way too much time in CS5 with the blended results to remove them. There has to be another (better & faster) way.
My thoughts are after shooting the five to seven images, shoot one more with a hand held speedlight to overcome the mixed light colors, and then adding this image to the mix before blending.
Have you had these color cast problems or tried the speedlight thing?
Thanks!
Hi Russell!
You can definitely do a flash frame to add to the mix. However I don’t think you’ll want to blend it in with Enfuse/HDR. What most people do is blend the regular brackets together, then pull the blended image plus your flash frame into Photoshop. Place the flash frame on top, and change the layer mode to Color. It’ll make a HUGE difference! The downside is the time it takes to get that flash frame on-site, and then the time it takes in post to bring every shot into Photoshop. But it works great at combatting those color casts!
The best of everything would be to get a photo perfect in-camera utilizing multiple speed lights. 🙂
Hi Lance
You mention incorporating the flash frame, should the individual flashed frame be a reasonably perfect exposed image incorporating flash or under/over exposed effect?, Power settings would you use around 1/2 power on the flash? any extra tips using flash with enfuse would be great.
Thanks!
Hi Andy,
I’ve only done it a couple of times. I found that blasting a flash in I got a good result, but the shadows ended up going orange on me when I would enfuse everything together. So although you aren’t going to get a perfect frame with a single flash, I would recommend getting as best you can. Probably just a kiss of light to showcase the actual colors of the space is all you would need.
Good luck!
Hi Lance
Firstly, thank you for sharing you knowledge and experience, excellent website. Just a quick question, in your first tutorial on file management you have your 3 folders – originals, full and small at the same level. In this tutorial when setting up export presets the check box for location is set to “place in same folder as original photo”. When I export, two folders full and small are created within the originals folder, not at the same level. Have I missed something, or do you just move them in the finder after export? Best regards, Paul.
You are correct Paul! They are placed in the Originals folder, and I then move them to the base directory/folder after exporting. Unfortunately with Lightroom that’s the only way you can control that the folders get placed in that shoot directory. For example, it would be nice if you could say “in the original folder, up one level”. But you can’t! So we put them in the originals folder, and then move them later.
Thanks Lance, makes sense now.
Hi Lance,
When I enfuse the stacks of images the ‘blended’ images will do not get imported into Lightroom even though I have checked the checkbox for them to do so. Sometimes I get an error message and sometime nothing, Do you have any idea on how to resolve his problem?
Many thanks in advance 🙂
Julie
Hi Julie,
Do you have plenty of hard drive free space? The only time I have ran into errors is when disk space is too low so the blended images can’t be saved.
Hi Lance,
Thanks for your reply 🙂
I have plenty of hard drive space and I have discovered the ‘blended’ images are opening into the ‘All photographs’ catalog instead of the ‘Previous import’ catalog where I have stacked the images. I am following your video for batch processing using LR/Enfuse but the blended image doesn’t appear on top of the stack or even next to it whether I selected ‘blend exposures’ with the stacks collapsed or expanded.
Thanks so much for your generosity. Your tips have significantly cut down my workflow. THANKS YOU 😀
Best regards,
Julie
Yes, the blended image won’t show up in Previous Import. It should show up however under the folder that you have imported. So under All Photographs, you should see the directory where your images are (I use an Originals folder). If you click on that folder, you should see the stacks along with the resulting blended photo. I still don’t have an answer for the errors, but maybe the blended images aren’t showing correctly with the stacks because you aren’t clicking on the imported folder, and instead are clicking on Previous Import, or All Photographs?
Hello Lance,
First and foremost want to thank you for the complete website, very helpful!!!! Can you be so kind and screenshot or list differences for your other presets, such as “proof”, “thumb”, and so on. Thank you in advance.
Chris
Hi Chris
Proof

Proof Watermark

Thumb

(These have to be run through a PhotoShop action to shrink them down to size. With Lightroom Exports, as far as I know, you can’t “crop”. You can only resize. So for instance in PhotoShop I resize to 120×100 or something, and then crop to 100×100 for a thumbnail.)
Small

Tour

(These go in my virtual tour links.)
Is the export destination option only Hard Drive? Can I export to Google Drive instead to save space in my computer?
By default it’s hard drive only, but perhaps there is a plugin for Lightroom that would enable this functionality?
Hi Lance,
What’s your policy/fee for going back to a property and updating a few rooms for the listing agent? I usually charge $125 for the shoot and am wondering if $100 is fair for going back after some rooms have been painted or re-arranged?
I’m having a hard time downloading endure
It’s just a zip file on the software’s website. Are you unable to download that zip file? If you can’t find it, it’s located here in the top right where it says Download:
http://www.photographers-toolbox.com/products/lrenfuse.php
Hi Kraig, it depends on how many shots are needed. I do an $85 minimum regardless of what they want/need. And they get up to 10 shots. Any more is $5/photo. So if they need 20 shots, it’s $85 + $50 = $135. It’s a tough line because you feel bad for the agent for having to repay, but your time is still just as valuable as it was before. And they probably should have made those changes prior to you showing up in the first place! Just do whatever you are most comfortable with but I would recommend putting a “limit” on how many photos they get so you aren’t re-shooting the entire property for a discounted rate.
Enfuse
Hi Lance
Quick question… How do you decide how many brackets you need to use? i noticed you normally use 5 brackets and know exactly which too use… In my camera, i normally take 9 exposures. But then i get a bit unsure on which ones are the appropriate ones… I tend to then choose -2 -1 0 1 2 and pretty much stick to that… but always wondering if the correct choice would be something else.
Thanks
I just pick the darkest exposure that has the most highlight detail I want. So for example, I choose the darkest exposure where the light bulbs aren’t totally blown out, where you can see their casings/covers/etc. I do the same for the brightest exposures, but looking on the shadows. I choose the brightest exposure that has my shadow/dark spots the brightest I need them, where I can see some detail in them and they aren’t pitch black.
Hi Lance and everyone.
Thanks for the great info.
I’m just wondering has anyone found a camera and post production setting that takes a great interior shot with the window view properly exposed?
I’m currently masking in window views but would like to be able to skip this step in my process if I can.
Thanks.
You won’t be able to get a great window view with just processing alone. Your options are to mask like you are currently doing, or use speed lights to boost the interior of the space up to match the exterior so the window doesn’t blow out. 🙂
Lance,
When shooting a house, I often use 2 different lenses. Maybe wide inside and another for outside shots. If I have an Auto Lens preset setup for import, how will lightroom deal with images coming in from the different lenses??
Thanks, Beian
It’s auto so it should pick up each lens separately. I don’t have an example handy to test and make sure – give it a shot and see what happens. 🙂
I noticed that you corrected your images first, blended them, and then corrected them again. What happens if you blend them first and then correct them? Does it significantly affect the outcome?
It probably won’t affect the outcome significantly. But when you blend together, you are blending an average of the pixel. So if your pixels are random colors, it could potentially be blending and producing an undesired result. I just play it on the safe side to try and get the best result possible. 🙂
Hi Lance,
Great site! I just have a few questions.
#1. Under the LR export settings, start number, you said…
“(Although the preview name of 001–FULL.jpg doesn’t look too good right now, before we go to export we’ll adjust the Title of the photo so the name will resemble the property address where we took the photo.)”
Do you ever revisit this? How do you get the address between 001- (my “title” address doesn’t show up) – FULL.jpg?
#2. In your File Management section you have the folder structure set up like this
Project Folder
Catalog Folder
Full
Originals
Small
Then in your LR Export settings under “export to” you chose “same folder as original photo” and check put into sub folder “full/small”. With those export settings it will create sub folders (full, small) inside the Originals folder, which would look like this…
Project Folder
Catalog Folder
Originals
Small
Full
Why is this different from the structure mentioned in the File Management section?
Glad you found the site!
#1 – Check my Lightroom processing video in the following post: https://www.tipsforrealestatephotography.com/how-to/real-estate-photography-tutorial-editing-with-lightroom-and-enfuse-hdr/ At 54:00 I discuss it. 🙂
#2 – The reason it’s different is because the File Management view is referencing the completed structure. We set the LR Export up to dump the exported images in the “same folder as original photo” because that allows us to create that export and use it for any photo shoot we want. Because we aren’t setting a “static” folder to export to. It will always export into the Originals folder. If we were to select a specific folder within our shoot, so the photos are exported outside of the Originals folder, future shoots would get exported into the incorrect folder…from a shoot in the past. Does that make sense? So after we export, we just pull the Full/Small folders out of the Original folder and place them in the main shoot directory, to get us to the File Management view.
Great article. I’ve used HDR in photoshop recently and I also don’t like how unrealistic it looks…
I have a few questions:
So you never use a flash?
Nothing under 22mm? I use a 10-22mm on aps-c sensor so that relates to 16mm I believe. I like it for smaller rooms such as bathrooms. Do you find it tough to shoot in bathrooms with a 24mm lens?
Have you considered using a tilt-shift, or are they too time consuming and expensive?
Thanks!
Hi Mike,
Correct, no flash. For stills I have a cropped sensor so I shoot No less than 14mm, which is 22.4mm at 35mm equivalent, plenty wide for bathrooms. 🙂
I understand lens distortion but I am incredibly curious how you are able to express the space of a home while shooting at 35mm; I cannot tell you how many RE Agents have commented that a particular photo does not properly portray the openness of a room.
I think you are mis-reading the information. It’s 22.4mm, at 35mm equivalent. So, 22.4mm. haha I say 35mm equivalent because if you use a cropped camera, the lens will state something other than 22.4/23mm… In Canon’s case, their cropped cameras will have you shooting around 14mm.
you are correct and I will blame it on the flu..
so long and thanks for all the tips
thanks Lance, I appreciate it! I just gave it a go. It works great. Thanks for the info and response
Lance,
This is all very confusing to me – can you help?
I can’t imagine how Lance or anyone could be more clear and detailed
Hey Lance,
Not sure if you’re still actively monitoring this comments section, but first wanted to thank you for this excellent information.
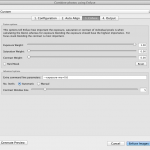
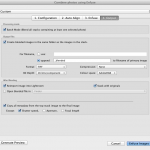
Secondly, I’ve gotten to the point where I’ve installed Enfuse, and I’m under the advanced options subtab where I add extra command line parameters. You call out that you add something here, but for some reason the pictures of your settings for this section are only thumbnails and I can’t make out any details of the image or your settings.
Can you specify what I should put in the extra command line?
Thank you very much,
Hey there Carson,
Yes the theme got updated and they did a complete re-code, which ruined a lot of the ways I was displaying content unfortunately. I’ve updated the thumbnails so they link to a full-size version of the settings. It doesn’t look perfect, but it works!
Lance
How do you access the screens that are shown above the header (“Lightroom Export Settings”) in the 4 thumbnails?
Lance, thanks so much for sharing personal settings and making it easier for other to figure the setup! My only question: My lightroom does not have the lens profile available for the lens i am shooting with ( Tamron 17-28 mm f/2.8) , and it doesn’t do any adjustments to images when set on auto per your recommendation. That being said how would i be able to apply lens corrections to all of the images in the catalog all at once?
Open up one image and apply any corrections that you want to apply to all images. So adjust the distortion, verticals, brightness, etc. Then save that preset under User Presets. When you import images in the future, you can auto-apply that preset during import, so it will fix your lens issues for you. 🙂