I am very adamant and clear that I do not stage properties. Clients know ahead of time that I am expected to focus on taking great photos when I arrive – not rearrange furniture or clean up after messy home sellers. Utilizing a professional home stager is one of the best things agents can do to increase the level of service they provide to sellers, however a lot of Realtors still don’t take advantage of the amazing results a stager brings to the table.
To protect myself from having to do anything I don’t want to do and also to promote the hiring of professional stagers, I created a prep/todo list website that I pass along to clients when appointments are booked.
What You’ll Need
In summary, here’s what you’ll need in order to create the above cheat sheet for sellers:
- Web Hosting
- A Domain or Subdomain (URL)
- The theme/design used to create the site
- Photos showcasing various spaces you have shot
- Content/copy for your “about me” section, or any other modifications you need to make
Let’s get right down to business and get our prep sheet started!
- (a) Purchase Hosting (Starter Package)
(b) Purchase a Domain (if you already have hosting)
(c) Use a Subdomain (if you already have hosting) - Purchase the Theme / Design
- Upload the Web Page to Our Web Hosting Account
- Test Our Web Page
- Copy/Paste My Prep List and Code
- Add Your Own Logo
- Add the Welcome Background Image
- Add the Remaining Images
- Adjust the Copy to Fit YOU
- Share Your Prep List
Web Hosting
In order for people to view your seller prep sheet, you need to have web hosting that will make your files available to the Internet. This is a simple, static, one-page site that’s not complicated at all, so I recommend using a hosting company like BlueHost (aff link). They are extremely cheap (under $5/month) and will suit us just fine for the purpose of this site!
1 (a). Purchase Hosting (Starter Package)
If you don’t have web hosting, head over to BlueHost and click on the green Get Started Now button on the front page.

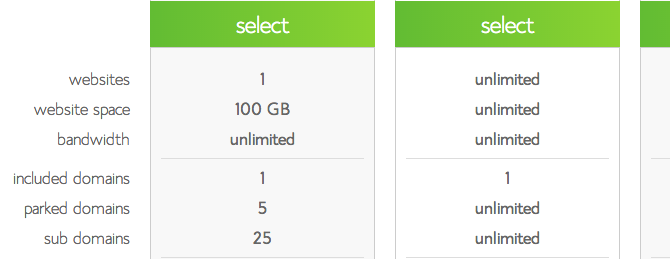
When you see the hosting options, select the Starter package. It’s plenty for what we need – no need to pay for more than necessary!
In the New Domain box, enter the domain (URL) you want people to type in their browser in order to access your seller prep list.
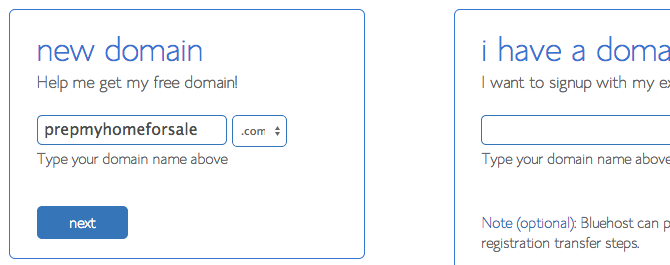
The next screen will either say:
“the domain prepmyhomeforsale.com is not available for registration”, in which case you need to go back and choose a different domain
or
“sign up – congratulations! The domain you have requested is available.”
Fill out your billing information in the boxes provided. When you get to the Package Information section, verify that the Starter plan is selected (note that the longer the term you select, the cheaper per month it will be). UN-CHECK the up-sells they are trying to get you to purchase. The only one that you may be interested in is Domain Privacy Protection where you information will be masked, but I vote go the cheap route and keep it public.
Fill out your credit information and submit, where you’ll find more products they will try to up-sell to you. Simply scroll down, and pass on any of the upgrades.
In the order confirmation page, there will be a blue button to create your password. Click it, and at the top of the page, enter your password twice in the boxes provided followed by hitting the Create button.
You are all set! You can now login to your web site control panel using the domain you selected, plus the password you just created.
Continue to Step 2
1 (b). Purchase a Domain (if you already have hosting)
Already have your website going strong so you don’t need hosting? Great! All you need to do is purchase a new domain and point it to your hosting company so sellers can find your new check list. Here’s how to do it with BlueHost, but your experience will vary based on who you have your current hosting through and who you purchase your domain from.
Login to your BlueHost account by visiting BlueHost.com and clicking on the Login link in the top right.
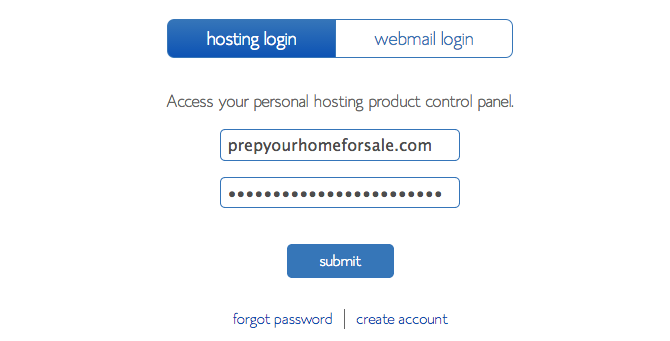
Under Hosting Login, enter your domain name that you already have through BlueHost along with your password and hit submit.
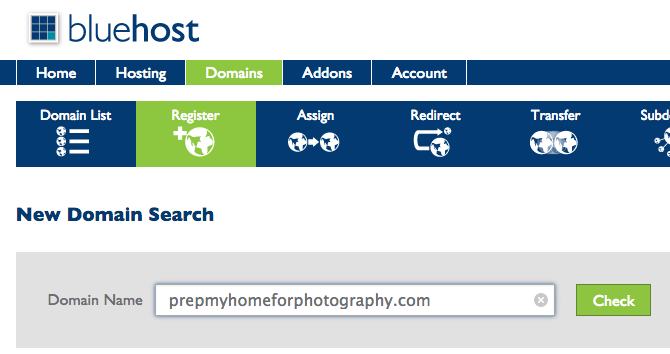
Click on Domains at the top, followed by the Register+ icon. A search box will come up where you’ll want to enter the new Domain that you wish to register for your seller prep list site and hit the Check button.
If the domain you requested is available, you’ll see it in the middle of the screen at the top. Click on the green shopping cart icon next to it, then click Next under the new Cart section that appears to the right.

You’ll be presented with a couple of options. The first is how you would like your domain to renew. I always set mine to auto-renew, but you could change this to manual renewal if you would like full control over when you are being billed, etc. You’ll also see the option for Domain Privacy which I don’t select, but you may like to if desired. Lastly make sure to check the Agree button to the Terms of Service, then click Add to Cart.
Complete your purchase if BlueHost allows you to go further, or verify your purchase as the instructions say on the screen.
Continue to Step 2
1 (c). Use a Subdomain (if you already have hosting)
Want to go on the cheap? Already have hosting and a website/domain for your main business? You can add a subdomain to your website that will allow home sellers to access your check list without purchasing an additional domain. For example, a previous blog post described creating virtual tours on the cheap with WordPress. The tour link that resulted from that post (http://tour.tipsforrealestatephotography.com/123-main-street-dallas-tx-75023/) is a subdomain of this site. The tour portion at the beginning signifies we are using a subdomain.
To create a subdomain with BlueHost, login to your BlueHost account by visiting BlueHost.com and clicking on the Login link in the top right.
Under Hosting Login, enter your domain name that you already have through BlueHost along with your password and hit submit.

At the top click on the Domains link, followed by the Subdomains icon.

In the Create Subdomain section, enter the subdomain you wish to create in the box provided, and hit the Create button.
Note: If you set your prep list up on a subdomain, adjust the below steps so the files you upload to your web host are submitted into the subdomain folder, not the public_html folder.
2. Purchase the Theme / Design
You could spend hours trying to make something pretty or even hire a designer to create something for you. But why waste the time and money when you can buy a professional-looking theme that not only looks great on desktop computers, but mobile/tablet devices as well?
Head over to ThemeForest and purchase the single-page Bed & Breakfast (aff link) template. When looking for a template to base my cheat list off of, I wanted to accomplish a couple of things.
- It needed to be beautiful/look nice
- It needed to be a single page – KISS
- It needed to adjust automatically to different screen sizes so it would look just as nice on a desktop as it would a mobile phone
I think you’ll agree all of those requirements were met!
Once you purchase/download the theme, open/extract the zip file and take a look at the contents. You should see the following:
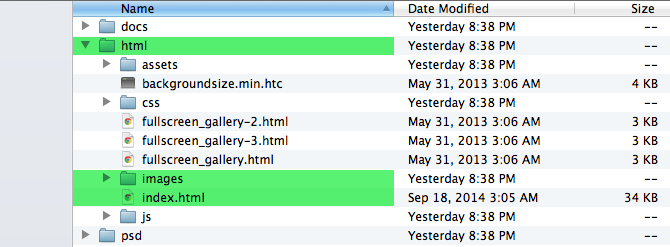
You’ll see in the screenshot here that we are only really going to be concerned with three folders/files. The html and images folder, and the index.html file. Good news for us, so we don’t have to do too much editing and we can ignore a lot of the other files!
Let’s get our web page up-and-running so we can see immediate progress.
3. Upload the Web Page to Our Web Hosting Account
 We purchased an awesome theme/design, we downloaded the file package, but now what? How do we get to see that beautiful web page on our very own website so we can start to tweak it into our seller’s checklist?
Head on over to BlueHost and login if you aren’t already. (BTW, if you login and a help screen comes up, feel free to close it. We got this on our own – we can do it!) Make sure you are under the HOME section, as noted in the top left bar. To upload the design, scroll down to the Files section and click on the File Manager icon.
You’ll be taken to a page that looks almost like your computer. On the left-hand side you’ll see a tree view of folders, and the right-hand side will show folders and files depending on where we are at within our website. We need to get inside the public_html folder. You can either click on the public_html folder in the left-hand tree view, or you can double-click on the public_html folder in the right-hand view to take you inside the folder.
If you have just started a new website with BlueHost, your view will look something similar to this (except you won’t have a sellers folder).
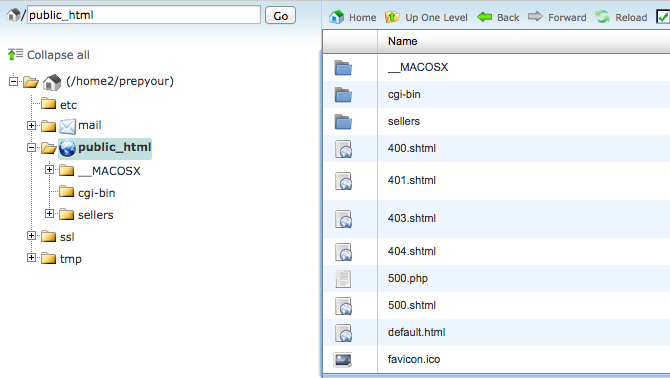
You can see in the path bar, next to the little house icon, it says /public_html so we know we have arrived at our destination successfully!
Now let’s upload all of our web files. This interface through BlueHost is great, however you can only upload one file at a time. So instead of uploading each web file individually, we are going to upload the entire zip file package that we downloaded from ThemeForest. We can then extract the zip file from within BlueHost and move the files around where necessary.
At the top, find and click on the Upload icon. In the next screen, click on the Choose File button that is in the top left. This will open up a file dialog window of your local computer. Navigate to where you downloaded the design from ThemeForest (the file is probably called codecanyon-########-something.zip), click on the zip file, and submit it for upload. You’ll see a progress bar in the bottom right that’ll say Complete once finished.
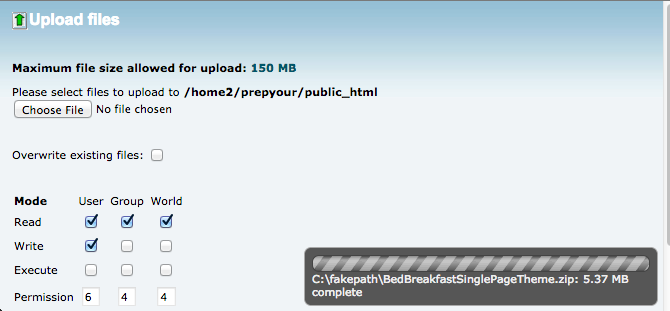
Don’t worry about any of the checkboxes under the Mode section. Once the progress bar says Complete, click on the link in the middle of the screen that says something like Back to /home2/<yourwebsite>/public_html.
You’ll be back to the public_html folder viewing all of the files, and you’ll see the zip file of the design that you just uploaded sitting there! Single click on it to highlight it, and then click on the Extract button icon at the top. When prompted, leave the defaults for the extraction path and click the Extract File(s) button. Click the Close button once the results are displayed.
We are almost ready to test our design and see how it looks on our new website! Before we give it a test, we need to move some files around.
You should have a new folder on your website that is named something like b&b_files_v.1.8. Double-click on that folder to hop inside.

And then double-click on the html folder to go inside it.

What we are now looking at, are all of the files needed for our one-page cheat sheet for sellers. There are some small buttons with text directly above the top assets folder. Toward the right, you’ll find Select All. Click that to highlight all of the folders and files we are viewing.
Then using your mouse, left-click and hold on one of the selected items, and drag them over to the public_html folder in the left-hand tree view, and release your mouse. That will move all of the files to that location for us, and the current folder we are viewing should now say This directory is empty.
4. Test Our Web Page
It’s time to view the design, live, on our new web page! Use your browser and navigate to domain/URL that you signed up for with BlueHost. In my case, it’s http://www.prepyourhomeforsale.com. You should see the base design of the Bed & Breakfast Theme, with image placeholders on the page:
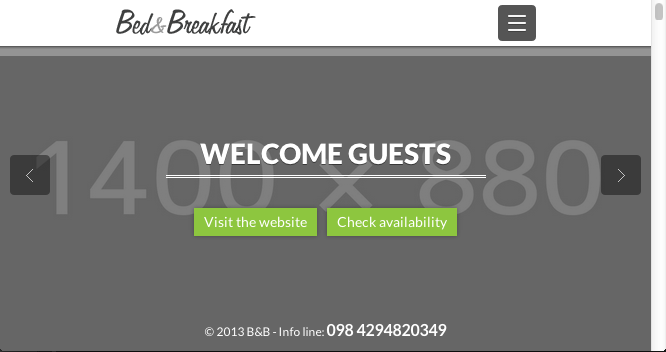
Woohoo! We are so close, now we just have to customize it with our own info and real estate photography photos!
5. Copy/Paste My Prep List and Code
Like I mentioned earlier, there’s no sense in reinventing the wheel, right? Although the Bed & Breakfast design is great, we need to modify it to fit our needs. We need to divide it up into sections for the various spaces in a home to help sellers prepare their home for photography.
Go back into BlueHost and back to your File Manager. Click on the public_html folder in the left-hand tree view. You should see all of your files now in the right-hand side. Single-click on index.html and then click on the Edit Code button at the top. When prompted, continue by hitting the Edit button. You should now see all of the “code” that makes up our prep list.
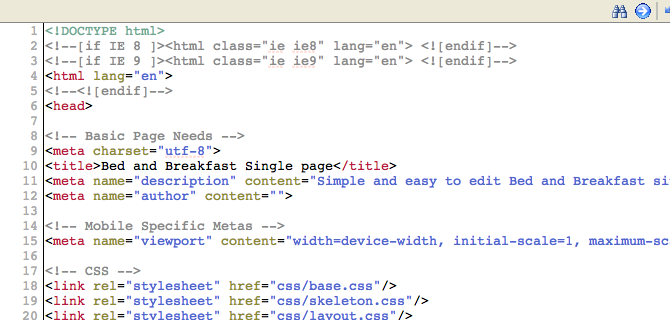
Instead of going through all of the lines and making modifications, let’s just make it easy and copy/paste what I have already done. First, select all of the text in the window and delete it so the file is blank. Then select and copy the below gray text, and paste it in to your file that you have open with your BlueHost File Manager.
<!DOCTYPE html>
<!--[if IE 8 ]><html class="ie ie8" lang="en"> <![endif]-->
<!--[if IE 9 ]><html class="ie ie9" lang="en"> <![endif]-->
<html lang="en">
<!--<![endif]-->
<head>
<!-- Basic Page Needs -->
<meta charset="utf-8">
<title>Real Estate Photography Company - Seller Prep List</title>
<meta name="description" content="How to prepare your home for real estate photography and attract the attention of buyers looking at your property online.">
<!-- Mobile Specific Metas -->
<meta name="viewport" content="width=device-width, initial-scale=1, maximum-scale=1">
<!-- CSS -->
<link rel="stylesheet" href="css/base.css"/>
<link rel="stylesheet" href="css/skeleton.css"/>
<link rel="stylesheet" href="css/layout.css"/>
<link rel="stylesheet" href="css/backgound-images.css"/>
<link rel="stylesheet" href="css/supersized.css"/>
<link rel="stylesheet" href="css/supersized.shutter.css"/>
<link rel="stylesheet" href="css/socialize-bookmarks.css">
<link rel="stylesheet" href="css/flexslider.css">
<link rel="stylesheet" href="css/touchTouch.css" />
<link rel="stylesheet" href="css/datepicker.css">
<link rel="stylesheet" href="css/weather.css" />
<!-- Google web fonts -->
<link href='http://fonts.googleapis.com/css?family=Lato:400,700,900' rel='stylesheet' >
<link href='http://fonts.googleapis.com/css?family=Yellowtail' rel='stylesheet'>
<style type="text/css">
ul.tips {list-style-type:square;}
#general ul.tips {font-size: 16px; margin: 24px; line-height: 20px; margin-top: 0px; padding-top: 0px;}
#exterior ul.tips {font-size: 22px; margin: 32px; line-height: 26px; margin-top: 0px; padding-top: 0px;}
#kitchen ul.tips {font-size: 24px; margin: 34px; line-height: 28px; margin-top: 0px; padding-top: 0px;}
#dining ul.tips {font-size: 24px; margin: 34px; line-height: 28px; margin-top: 0px; padding-top: 0px;}
#living ul.tips {font-size: 24px; margin: 34px; line-height: 28px; margin-top: 0px; padding-top: 0px;}
#bedrooms ul.tips {font-size: 24px; margin: 34px; line-height: 28px; margin-top: 0px; padding-top: 0px;}
#bathrooms ul.tips {font-size: 24px; margin: 34px; line-height: 28px; margin-top: 0px; padding-top: 0px;}
#pets ul.tips {font-size: 24px; margin: 34px; line-height: 28px; margin-top: 0px; padding-top: 0px;}
.help { padding: 10px; font-size: 16px; }
#expectation ul.tips {font-size: 24px; margin: 34px; line-height: 28px; margin-top: 0px; padding-top: 0px;}
#why, #exterior, #dining, #bedrooms, #pets, #expectation {background: #fff;}
 #general, #kitchen, #exterior-2, #living, #bathrooms, #help {background: #e9f8ff;}
 #why, #general, #exterior, #exterior-2, #kitchen, #dining, #living, #bedrooms,
 #bathrooms, #pets, #help, #expectation { padding-bottom:50px;}
 #activities { padding-bottom:40px;}
/*Background2------------------------------------------*/
.bg2 {
background: url(images/afterkitchen.jpg) 50% 50% fixed repeat-y;
width: 100%;
height: 100%;
margin: 0 auto;
position: absolute;
background-size: 100%;
box-shadow: inset 0px 0px 20px rgba(0, 0, 0, 0.8);
}
</style>
<!--[if lt IE 9]>
<script src="http://html5shim.googlecode.com/svn/trunk/html5.js"></script>
<![endif]-->
<!-- Lets you use only unprefixed CSS -->
<script src="js/prefixfree.min.js"></script>
<!-- Favicons-->
<link rel="shortcut icon" href="images/favicon.png">
<link rel="apple-touch-icon" href="images/apple-touch-icon.png">
<link rel="apple-touch-icon" sizes="72x72" href="images/apple-touch-icon-72x72.png">
<link rel="apple-touch-icon" sizes="114x114" href="images/apple-touch-icon-114x114.png">
<!-- Jquery -->
<script src="js/jquery1.8.2.min.js"></script>
<!-- HTML5 and CSS3-in older browsers-->
<script src="js/modernizr.custom.17475.js"></script>
</head>
<body>
<!-- =========================Start Homepage section============================= -->
<section id="homepage">
<header>
<div class="container">
<div class="four columns">
<a href="#homepage" class="scroll_home"><img src="images/logo.png" height="26" alt="Logo" class="scale-with-grid" id="logo-in"></a><!-- Your logo -->
</div>
<div class="btn-responsive-menu"> <span class="icon-bar"></span> <span class="icon-bar"></span><span class="icon-bar"></span></div> <!-- Responsive nav button -->
<nav class="twelve columns omega" id="top-nav">
<!-- Start Nav Links -->
<ul>
<li><a href="#why">Why</a></li>
<li><a href="#general">General</a></li>
<li><a href="#exterior">Exterior</a></li> <!-- front and back -->
<li><a href="#kitchen">Kitchen</a></li>
<li><a href="#dining">Dining</a></li>
<li><a href="#living">Living</a></li>
<li><a href="#bedrooms">Beds</a></li> <!-- master and guest -->
<li><a href="#bathrooms">Baths</a></li>
<li><a href="#pets">Pets</a></li>
<li><a href="#help">Help</a></li>
<li><a href="#expectation">Expectation</a></li>
</ul><!-- End Nav Links -->
</nav><!-- End Navigation -->
</div>
</header>
<div id="intro-txt">
<h1>Welcome Homeowners</h1>
<h2>Prepping your home to <strong>MAXIMIZE</strong> photo potential</h2>
</div><!-- End intro text -->
<!-- <a id="prevslide" class="load-item"></a> <a id="nextslide" class="load-item"></a> -->
<div id="footer-homepage">© Real Estate Photography Company</div>
</section>
<!-- =========================Start Homepage section============================= -->
<!-- =========================Start Why section============================= -->
<section id="why">
<div class="section-title-2">
<div class="container">
<h2>Why Prep For Photos?</h2>
<p>- Make The First Impression Count - </p>
</div>
</div>
<div class="container">
<!-- Start Room 1 -->
<article class="clearfix">
<div class="seven columns alpha">
<div class="flexslider thumbs" data-gallery="two">
<ul class="slides">
<li><figure><img src="images/why.jpg" alt=""></figure></li>
</ul>
</div><!-- end flexi-->
</div>
<div class="nine columns omega">
<div class="spacer-3">
<h3>Online<span>It's where buyers start</span></h3>
<p>The majority of home buyers start their search online, so it is important to make the first impression count!
Follow these tips to prepare your home for the best real estate photos possible.</p>
</div>
</div>
</article><!-- End Room 1 -->
</div><!-- End Container -->
</section>
<!-- =========================End Why section============================= -->
<!-- =========================Start General section============================= -->
<section id="general">
<div class="section-title-2">
<div class="container">
<h2>General</h2>
<p>- Tips for all areas in the home - </p>
</div>
</div>
<div class="container">
<!-- Start Room 1 -->
<article class="clearfix">
<div class="nine columns omega">
<div>
<p>
<ul class="tips">
<li>Thoroughly clean whole house (vacuum carpet, mop hard floors, clean countertops, clean windows)</li>
<li>Turn all overhead lights and lamps ON</li>
<li>Replace all burned out light bulbs</li>
<li>Use bulbs of the same temperature (ALL incandescent or ALL compact fluorescent)</li>
<li>Turn all ceiling fans OFF</li>
<li>Turn all TVs OFF</li>
<li>Turn all computer screens OFF</li>
<li>Open blinds/window treatments to let in outside light</li>
<li>Remove personal photographs (or replace with general landscape/object photographs)</li>
<li>Make all beds</li>
<li>Remove small floor rugs to reveal actual flooring</li>
<li>Place all shoes/jackets in closets</li>
</ul>
</p>
</div>
</div>
<div class="seven columns alpha">
<div class="flexslider thumbs" data-gallery="two">
<ul class="slides">
<li><figure><img src="images/general.jpg" alt=""></figure></li>
</ul>
</div><!-- end flexi-->
</div>
</article><!-- End Room 1 -->
</div><!-- End Container -->
</section>
<!-- =========================End General section============================= -->
<!-- =========================Start Exterior section============================= -->
<section id="exterior">
<div class="section-title-2">
<div class="container">
<h2>Exterior</h2>
<p>- Online “curb appeal” and a relaxing oasis - </p>
</div>
</div>
<div class="container">
<!-- Start Room 1 -->
<article class="clearfix">
<div class="section-title-3">
<h3>Front Exterior</h3>
<p>Online “curb appeal” - the front exterior is usually the first photo buyers see</p>
</div>
<div class="seven columns alpha">
<div class="flexslider thumbs" data-gallery="two">
<ul class="slides">
<li><figure><img src="images/front.jpg" alt=""></figure></li>
</ul>
</div><!-- end flexi-->
</div>
<div class="nine columns omega">
<div>
<p>
<ul class="tips">
<li>Close garage doors</li>
<li>Remove cars from driveway and front of home</li>
<li>Clean up landscaping (mow, trim shrubs, clear leaves)</li>
<li>Remove empty planters</li>
<li>Use broom to remove cobwebs from eaves and door frames</li>
<li>Remove visible water hoses</li>
<li>Remove toys, sports balls, basketball goals, soccer goals, etc.</li>
</ul>
</p>
</div>
</div>
<div class="clearfix"></div>
<p> </p>
<div class="section-title-3">
<h3>Back Yard</h3>
<p>The back yard should be an oasis to relax</p>
</div>
<div class="nine columns omega">
<div>
<p>
<ul class="tips">
<li>Clean porch, tidy up outdoor tables/chairs/cushions</li>
<li>Pillows/cushions should be fresh, not faded</li>
<li>Clear out kid's toys, balls, frisbees, etc.</li>
<li>Clean pool</li>
<li>Remove pool vacuum/cleaner hose</li>
<li>Hide pool cleaning supplies</li>
<li>Turn on pool fountains/water features</li>
<li>Remove visible water hoses</li>
<li>Remove trash cans</li>
</ul>
</p>
</div>
</div>
<div class="seven columns alpha">
<div class="flexslider thumbs" data-gallery="two">
<ul class="slides">
<li><figure><img src="images/back.jpg" alt=""></figure></li>
</ul>
</div><!-- end flexi-->
</div>
</article><!-- End Room 1 -->
</div><!-- End Container -->
</section>
<!-- =========================End Exterior section============================= -->
<!-- =========================Start Kitchen section============================= -->
<section id="kitchen">
<div class="section-title-2">
<div class="container">
<h2>Kitchen</h2>
<p>- Sometimes the focal point, the kitchen deserves attention to detail - </p>
</div>
</div>
<div class="container">
<!-- Start Room 1 -->
<article class="clearfix">
<div class="seven columns alpha">
<div class="flexslider thumbs" data-gallery="two">
<ul class="slides">
<li><figure><img src="images/kitchen.jpg" alt=""></figure></li>
</ul>
</div><!-- end flexi-->
</div>
<div class="nine columns omega">
<div>
<p>
<ul class="tips">
<li>Clear countertops completely. <strong>No</strong> knife blocks, baking supplies, mail, etc.</li>
<li>Leave out max of one small appliance (ex. coffee maker)</li>
<li>Clear outside of refrigerator of magnets, papers, photos, etc.</li>
<li>Hide garbage cans in pantry or closet</li>
<li>Remove dishes from sink, place in dishwasher</li>
</ul>
</p>
</div>
</div>
</article><!-- End Room 1 -->
</div><!-- End Container -->
</section>
<!-- =========================End Kitchen section============================= -->
<!-- Start Background -->
<div id="bg-container-2">
<span class="border-top"></span>
<div class="bg2"></div>
<div class="container">
<p> </p>
<p> </p>
<p> </p>
<p> </p>
<p> </p>
<p> </p>
<br class="clear">
</div>
</div><!-- End Background -->
<!-- =========================Start Dining section============================= -->
<section id="dining">
<div class="section-title-2">
<div class="container">
<h2>Dining Room / Table</h2>
<p>- Allow buyers to imagine a nice family meal - </p>
</div>
</div>
<div class="container">
<!-- Start Room 1 -->
<article class="clearfix">
<div class="nine columns omega">
<div>
<p>
<ul class="tips">
<li>Clear table, dust and polish the table top</li>
<li>Use decorative place setting if available</li>
<li>Feature one center piece such as a bouquet of flowers</li>
<li>Straighten all chairs and space them evenly</li>
<li>Remove child seats/booster chairs</li>
</ul>
</p>
</div>
</div>
<div class="seven columns alpha">
<div class="flexslider thumbs" data-gallery="two">
<ul class="slides">
<li><figure><img src="images/dining.jpg" alt=""></figure></li>
</ul>
</div><!-- end flexi-->
</div>
</article><!-- End Room 1 -->
</div><!-- End Container -->
</section>
<!-- =========================End Dining section============================= -->
<!-- =========================Start Living section============================= -->
<section id="living">
<div class="section-title-2">
<div class="container">
<h2>Living / Family Room</h2>
<p>- The space to enjoy conversation and spend quality time with family - </p>
</div>
</div>
<div class="container">
<!-- Start Room 1 -->
<article class="clearfix">
<div class="seven columns alpha">
<div class="flexslider thumbs" data-gallery="two">
<ul class="slides">
<li><figure><img src="images/living.jpg" alt=""></figure></li>
</ul>
</div><!-- end flexi-->
</div>
<div class="nine columns omega">
<div>
<p>
<ul class="tips">
<li>Remove stacks of magazines, papers, mail, etc.</li>
<li>De-clutter fireplace mantel/hearth (no more than 5 items, including art)</li>
<li>Clean interior of fireplace and re-paint if needed</li>
<li>Fluff and arrange furniture pillows</li>
<li>Remove kid's toys</li>
</ul>
</p>
</div>
</div>
</article><!-- End Room 1 -->
</div><!-- End Container -->
</section>
<!-- =========================End Living section============================= -->
<!-- =========================Start Bedrooms section============================= -->
<section id="bedrooms">
<div class="section-title-2">
<div class="container">
<h2>Bedrooms</h2>
<p>- Rest for you and guests - </p>
</div>
</div>
<div class="container">
<!-- Start Room 1 -->
<article class="clearfix">
<div class="section-title-3">
<h3>Master Bedroom</h3>
<p>A good nights rest recharges the body and mind</p>
</div>
<div class="nine columns omega">
<div>
<p>
<ul class="tips">
<li>Make bed, including decorative pillows/shams if available</li>
<li>Press bed linens and bed skirts</li>
<li>Clear nightstands of all personal items</li>
<li>Store away phone/tablet charging cables</li>
<li>Remove all clutter from top of dressers</li>
<li>Remove family photos from walls</li>
<li>Clean under bed, removing items that may show in the photos</li>
</ul>
</p>
</div>
</div>
<div class="seven columns alpha">
<div class="flexslider thumbs" data-gallery="two">
<ul class="slides">
<li><figure><img src="images/master.jpg" alt=""></figure></li>
</ul>
</div><!-- end flexi-->
</div>
<div class="clearfix"></div>
<p> </p>
<div class="section-title-3">
<h3>Kid/Guest Bedroom</h3>
<p>Don’t forget about guest bedrooms</p>
</div>
<div class="seven columns alpha">
<div class="flexslider thumbs" data-gallery="two">
<ul class="slides">
<li><figure><img src="images/guest.jpg" alt=""></figure></li>
</ul>
</div><!-- end flexi-->
</div>
<div class="nine columns omega">
<div>
<p>
<ul class="tips">
<li>Remove personalized names from walls</li>
<li>Remove wall stickers/posters</li>
<li>Remove diaper genies</li>
<li>Clean under bed, removing items that may show in the photos</li>
</ul>
</p>
</div>
</div>
</article><!-- End Room 1 -->
</div><!-- End Container -->
</section>
<!-- =========================End Bedrooms section============================= -->
<!-- =========================Start Bathrooms section============================= -->
<section id="bathrooms">
<div class="section-title-2">
<div class="container">
<h2>Bathrooms</h2>
<p>- To be spa-like, the bathroom must be clear of all personal items - </p>
</div>
</div>
<div class="container">
<!-- Start Room 1 -->
<article class="clearfix">
<div class="nine columns omega">
<div>
<p>
<ul class="tips">
<li>Clear countertops completely. <strong>No</strong> soap, toothbrushes, medications, deodorant, etc.</li>
<li>Put toilet seats down</li>
<li>Close closet doors</li>
<li>Remove shampoo, soap, loofahs, etc. from showers and tubs</li>
<li>Remove dirty towels - leave out only new, unused towels</li>
<li>Remove floor mats</li>
</ul>
</p>
</div>
</div>
<div class="seven columns alpha">
<div class="flexslider thumbs" data-gallery="two">
<ul class="slides">
<li><figure><img src="images/bathrooms.jpg" alt=""></figure></li>
</ul>
</div><!-- end flexi-->
</div>
</article><!-- End Room 1 -->
</div><!-- End Container -->
</section>
<!-- =========================End Bathrooms section============================= -->
<!-- =========================Start Pets section============================= -->
<section id="pets">
<div class="section-title-2">
<div class="container">
<h2>Pets</h2>
<p>- Pets are loving, but their presence should be minimized - </p>
</div>
</div>
<div class="container">
<!-- Start Room 1 -->
<article class="clearfix">
<div class="seven columns alpha">
<div class="flexslider thumbs" data-gallery="two">
<ul class="slides">
<li><figure><img src="images/pets.jpg" alt=""></figure></li>
</ul>
</div><!-- end flexi-->
</div>
<div class="nine columns omega">
<div>
<p>
<ul class="tips">
<li>Place food and water bowls in pantry or closet</li>
<li>Place pet beds/toys in pantry or closet</li>
<li>Use lint roller on furniture to remove pet hair</li>
<li>Contain pets in hidden crate or outside</li>
<li>Clear back yard of pet waste/toys</li>
</ul>
</p>
</div>
</div>
</article><!-- End Room 1 -->
</div><!-- End Container -->
</section>
<!-- =========================End Pets section============================= -->
<!-- =========================Start Need Help section============================= -->
<section id="help">
<div class="section-title-2">
<div class="container">
<h2>Need Help?</h2>
<p>- Staging helps provide top dollar and a quick sale - </p>
</div>
</div>
<div class="container">
<!-- Start Room 1 -->
<article class="clearfix">
<div class="nine columns omega">
<div class="help">
<p>
<strong>Selling your home is like selling a product</strong> - it must be marketed correctly to reach a specific buyer.
Although your furnishings and decor are great for your lifestyle, it’s important to optimize your home
for the future buyer.
</p>
<p>
All of the tips suggested in the previous sections were approved by <strong>professional home stagers</strong> from the
Real Estate Staging Association (RESA).
<p>
A professional home stager can provide you with a consultation to help you prepare your home for sale
and make sure your home shows at its best online through the photographs.
</p>
<p>
To find a <strong>RESA</strong> professional stager in your area, visit their website:
</p>
<p style='text-align: center;'>
<a href='http://www.realestatestagingassociation.com'>http://www.realestatestagingassociation.com</a>
</p>
</div>
</div>
<div class="seven columns alpha">
<div class="flexslider thumbs" data-gallery="two">
<ul class="slides">
<li><figure><img src="images/needhelp.jpg" alt=""></figure></li>
</ul>
</div><!-- end flexi-->
</div>
</article><!-- End Room 1 -->
</div><!-- End Container -->
</section>
<!-- =========================End Need Help section============================= -->
<!-- =========================Start Expectation section============================= -->
<section id="expectation" >
<div class="section-title-2">
<div class="container">
<h2>What to Expect</h2>
<p>- Expectation During the Photo Shoot - </p>
</div>
</div>
<div class="container">
<!-- Start Room 1 -->
<article class="clearfix">
<p>
<strong>The house should be shoot-ready when I arrive</strong>
</p>
<p>
Hi I’m Lance Selgo, owner and photographer of Unique Exposure Photography. I look forward to taking photos of your home!
</p>
<p>
I want the photos of your home to be the best they can be. This requires teamwork and cooperation that will result in an
outstanding online presence when your home goes LIVE on the market.
</p>
<p>
Although I would love to help you style/design your home, I unfortunately do not have the skill set required to do so.
When I arrive to take photos of your property, I ask that all staging and cleaning be done prior to my arrival. To
efficiently maintain my busy schedule and deliver the level of service my clients expect, I can not spend unnecessary
time at the home waiting for it to be cleaned, dusted, de-cluttered, etc.
</p>
<p>
<strong>Please review the previous sections for tips on preparing your home for real estate photography, and note that I am not
responsible and will not partake in any of the following duties while photographing your home:</strong>
</p>
<div class="seven columns alpha">
<div class="flexslider thumbs" data-gallery="two">
<ul class="slides">
<li><figure><img src="images/headshot.jpg" alt=""></figure></li>
</ul>
</div><!-- end flexi-->
</div>
<div class="nine columns omega">
<div>
<h3>I Do Not:</h3>
<ul class="tips">
<li>Move or re-arrange furniture</li>
<li>Make beds, clean, dust or de-clutter</li>
<li>Pick up toys or yard items</li>
<li>"Photoshop" vehicles, walls, damaged walls, power lines, wall pictures, cords, etc.</li>
<li>Touch personal bathroom supplies (shampoo, toothbrushes, deodorant, towels)</li>
</ul>
</div>
</div>
</article>
<article class="clearfix">
<br />
<p>
In addition to taking photos of properties, I teach a photography segment twice a year at
Collin County Community College and I operate
Tips for Real Estate Photography
where I share the ins-and-outs of running a real estate photography business from
client acquisition, to photo processing and photo delivery. You can connect with me
via the social media networks below.
</p>
<p style="text-align: center;">
<a href="https://plus.google.com/">Google+</a>
-
<a href="http://www.facebook.com/">Facebook</a>
-
<a href="http://www.twitter.com/">Twitter</a>
</p>
</article><!-- End Room 1 -->
</div>
</section>
<!-- =========================End Expectation section============================= -->
<!-- Homepage slideshow -->
<script src="js/jquery.easing.min.js"></script>
<script src="js/supersized.3.2.7.min.js"></script>
<script src="js/supersized.shutter.min.js"></script>
<script>
jQuery(function($){
$.supersized({
slides : [ // Slideshow Images
{image : 'images/welcome.jpg'},
{image : 'images/slider/3.jpg'},
{image : 'images/slider/4.jpg'},
{image : 'images/slider/5.jpg'} // Last has no comma
]
});
});
</script>
<script src="js/jquery.jcarousel.min.js"></script>
<script src="js/quotes.min.js"></script>
<script src="js/flexi_slider.js"></script>
<script src="js/jquery.poshytip.min.js"></script>
<script src="js/tabs.js"></script>
<script src="js/touchTouch.jquery.js"></script>
<script src="js/jquery.validate.js"></script>
<script src="js/jquery.zweatherfeed.js"></script>
<script src="js/jquery.scrollTo.js"></script>
<script src="js/jquery.nav.js"></script>
<!-- Date picker-->
<script src='js/1.8.jquery-ui.min.js'></script>
<script src="js/jquery.ui.core.js"></script>
<script src="js/jquery.ui.widget.js"></script>
<script src="js/jquery.ui.datepicker.min.js"></script>
<script src="js/functions.js"></script>
Once you paste the above text into your file, click the Save Changes button in the top right. Now go back to your browser that has your website URL in it and refresh. We are getting closer! You should see the design, but now it has all of the tips for the seller in there! Let’s take a look at changing up the images.
6. Add Your Own Logo
 We need to replace that Bed & Breakfast logo! Open up PhotoShop or your image editor of choice, and create a new logo. In order to look nice, the logo should only be 26 pixels in height. For the width, I would recommend keeping it within 250 pixels wide. Save your logo with the filename logo.png somewhere on your local computer.
Head over to BlueHost and go into the File Manager if you aren’t there already. Make sure you click on the public_html folder in the left-hand tree view. Now in the right-hand side, double click on the images folder to pop inside it. Click on the Upload button icon in the top, then click on Choose File and find your logo.png that you saved on your computer. Submit it, and when prompted, you want to Overwrite any existing logo.png file.
Once the upload is complete, click on the Back to… link in the middle of the File Manager window, and go refresh your cheat sheet web page to see the changes. Your logo should be in the top left corner now instead of the Bed & Breakfast logo!
7. Add the Welcome Background Image
When sellers visit your check list, they are greeted with a welcome and a huge image in the background. We need to replace that background image with something from your portfolio. I recommend blurring the photo with your editor of choice so it’s easier for sellers to read the welcome text that is placed on top of it. Find a high-resolution photo that you want to use, shrink it down so the width is around 1500-2000 pixels, and save it to your local computer titled welcome.jpg.
Head over to the BlueHost File Manager, and you should currently be inside the images folder. If not, navigate to /public_html/images. Like we have done previously, click on the Upload button icon, and send the welcome.jpg file to your site. Now when you refresh your live site, you should see your new portfolio shot is there in the background!
8. Add the Remaining Images
The remaining images that fill our check list are all related to sections of the prep sheet. Follow the same process for each one. Choose an image (but don’t blur it like we did for the Welcome image), size it correctly, name it exactly like below, then upload it through the BlueHost File Manager. Here are the images along with their sizes and filenames that you need to upload to the /public_html/images folder in the BlueHost File Manager.
- why.jpg
- This photo goes with the section that asks “Why prep for photos”? This can be any strong portfolio image that you have.
- Size: 400px wide landscape format
- general.jpg
- This photo goes with the “general” section with basic tips that apply to all spaces. Use a strong portfolio image, but I recommend an interior living or family room.
- Size: 400px wide landscape format
- front.jpg
- Use a front exterior shot.
- Size: 400px wide landscape format
- back.jpg
- Use a back yard shot.
- Size: 400px wide landscape format
- kitchen.jpg
- Use a kitchen shot.
- Size: 400px wide landscape format
- afterkitchen.jpg
- This is the photo that’s full-screen (wide) immediately following the kitchen section. I chose a white kitchen for my site because it shows up after the kitchen section, but feel free to use any impressive portfolio shot here.
- Size: 1500-2000px wide landscape format
- dining.jpg
- Use a formal dining shot.
- Size: 400px wide landscape format
- living.jpg
- I recommend a family room shot here.
- Size: 400px wide landscape format
- master.jpg
- Use a master bedroom shot.
- Size: 400px wide landscape format
- guest.jpg
- I recommend a kid’s room shot, as a guest room with a bed will be redundant with a master bedroom.
- Size: 400px wide landscape format
- bathrooms.jpg
- Use a master bathroom shot.
- Size: 400px wide landscape format
- pets.jpg
- Use a shot of your own pet or find a neighbor/friend that has a pet that you can take a photo of.
- Size: 400px wide landscape format
- needhelp.jpg
- This is the RESA (Real Estate Staging Association) logo. You can upload any type of photo here depending on what type of content you fill in this area. You may offer staging yourself, in which case you could just use a stock image of a family frustrated by moving or something.
- Size: 400px wide landscape format
- headshot.jpg
Whew! After uploading the 16 images (including your welcome image background and logo), head over and refresh your new cheat sheet page. It should be looking great! All of the photos will be there, so the only thing that’s left is to change some of the copy and adjust a couple of social media links. Still with me? Let’s go!
9. Adjust the Copy to Fit YOU
Almost done! But we still have some things to adjust to customize the seller prep page to you and your company. In this step we are going to be modifying the index.html file that’s located in the public_html folder. Head over to BlueHost and open the File Manager, and in the left-hand side tree view, click on public_html.
You’ll see the index.html file in the right-hand side. Single-click the file, then click on the Code Editor icon button at the top. If prompted, select the Edit button. For the below steps, we’ll be using the binoculars, aka search button.

- Provide your company name
- Click on the search button, and in the Search field enter: Real Estate Photography Company
- In the Replace field, enter the name of your real estate photography business
- Hit the Replace All button
- Modify the tips in each section
- Scroll through the document and find each section of tips
- Modify the items if you wish to add/delete/re-word any of the tips provided
- Modify the need help section
- Search for “Start Need Help section” in the document
- Make the necessary changes to this section
- This is where you offer additional help for sellers if they are in need
- Modify the expectation section
- Search for “Start Expectation section” in the document
- Make the necessary changes to this section
- This is where you’ll give a brief bio of yourself, and list what you are or are not expected to do during the photo shoot
- Add Your Social Media Links
- Search for “Google+” in the document
- Change the URLs to point to your Google+, Facebook and Twitter accounts
Once you’ve made the updates necessary, click the Save Changes button in the top-right. Refresh your seller’s prep list web page and everything should be good to go!
10. Share Your Prep List
Share your prep list with your agents. Every shoot I schedule, the agent gets a scheduling confirmation via email that includes a link to the prep list. They are encouraged to pass it along to the seller to prepare for real estate photography.



Lance, good stuff. Just wondering, though…what exactly do you see as the benefit of creating a website for this instead of a PDF document that they could view and/or print out? I created a PDF checklist that I provide to all of the agents that I work with, as well as homeowners that are selling their homes themselves. Just trying to understand the value or benefit of creating a website versus a PDF document.
Would also love to know how many of your clients always adhere to your policy. I find that some agents are extremely meticulous and always ensure the properties are staged and look great for photos. But those are few and far between. I usually do end up decluttering a bit and moving things like soap bottles, toothbrush holders, folding hand towels in bathrooms, etc. It is indeed time consuming and does frustrate me…but I guess I haven’t gotten the courage to all-out refuse to shoot a property if it’s not 100% ready. I know some photographers will just shoot it “as is” with the attitude that if it’s there, it will be in the shot. While I understand that philosophy, I’ve been reluctant to do that because I feel that my images are a representation of me, and even though it’s not my job to clean and declutter, that kind of stuff ruins images and then I end up looking bad. Know what I mean?
I’ve been meaning to get a conversation going on this subject, so I’d love to know how you handle those situations.
I certainly am not “above” moving or shifting things around to get a shot. But I agree with you that our job is to take pictures, not clean the house.
I really do need to figure out a way to get more agents to understand this, for sure!!!
A website that’s mobile friendly is easier to view across different devices. Additionally, the homeowner doesn’t have to download the pdf onto multiple devices if need be, or mess with email attachments from agents, etc. It’s just more readily available and easier to work with. Additionally to make any modifications or adjustments, it’s very quick. You don’t have to edit a document, save it back as a PDF, etc. Everything I do is web-based, that’s just how I’ve handled my business from the get-go so for me it just makes sense. May not be that way for others. The big thing is do what YOU do and what works for YOU. 🙂
I am lucky in that a lot of my homes are shot for agents that take their job seriously and they hire a professional home stager prior to my arrival. The only photos I “share” are ones that are of staged properties that look outstanding – those are my portfolio pieces. When I go into a property that clearly isn’t ready, I don’t touch anything because of two reasons:
Because I don’t actively share properties that aren’t immaculate, I don’t see it as a poor representation of me when I deliver photos to a client with things out of place. In the end, it’s THEIR brand that we are building/controlling. And if that’s the way they want to build their business, by all means have at it! Honestly, those are the types of clients that I appreciate their support, but they aren’t THE CLIENT I want. So I’m not worried about losing them because I didn’t fix a towel, etc.
If they provided a better level of service to their home owner by using a stager, I would be way more accommodating in making sure everything looks outstanding because they did everything in their power. The ones that slack off and try to save money – sorry but I’m not going to bend over backwards for you when you don’t for your client.
I know it all sounds mean, and I don’t intend it to! I’m really not stuck up or think some agents are doing a poor job. It’s just I know what they make, and I know the inexpensive marketing services they could provide to sellers that make all the difference in the world. When they try to take the cheap route I just lose any ambition to go that extra mile.
Great tutorial Lance. Thank you!
Welcome Bill!
I’d like to shake your hand for providing such a wealth of information, you have my utmost respect. One thing though, I’m sure I’m missing something really obvious but rather than creating a separate website or indeed a PDF (as Jack mentioned) for the seller checklist, couldn’t you just simply make a page on your existing website with all the relevant information for sellers? Thanks again for all the info.
Hi Tom,
You certainly could just create something on your site! I wanted to use a specific mobile-friendly theme and a unique URL, so I just thought it would be easier to make a new site. But yes any way that works for you to create that list, works for me! There is no right way to do any of this, just sharing my experiences so we can all learn together. 🙂
Great article. As it turns out, I’ve been running into staging scenarios lately. One house in particular was rather “lived in”… beds weren’t made, bathrooms had personal items still out and visible. I shot it as-is. On the flip side of that, a few days ago I was asked to come back to do re-shoots for a realtor selling his own home. The guest room had a comforter that looked crooked on the bed and the toilet seat was up in the master bath. I should have noticed these things before I shot the rooms. I learned a valuable lesson as I didn’t charge for the re-shoots. I plan to have a Terms and Conditions page on my site that will state staging re-shoots will be billable.
Good example Paul, and glad to hear you learned from it AND that you are taking action to avoid any confusion in the future! We all make mistakes, but learning from them is a sign of a true professional!
Love this tutorial like so many of your others!! Do you have any tutorials similar to this one but for uploading Lightroom web galleries into a website or creating a website that you can use the Lightroom web gallery’s in?
Hi Angela,
I’ve actually never played around with Lightroom web galleries!
Many thanks Lance, for clarity – can we use your content and create a similar website / page?
Again, Many thanks for your all posts.
Absolutely – have at it.
Lance, I have been reading your Tips non-stop for a few days now and I must say your clear and concise information is exactly what I need to help my business. Last fall I became a landlord, puppy owner, and self-employed on the same day and it has definitely been quite a balancing act.
It has become clear to me that I have some work to do to bring myself up to the standard you have presented. I agree with practically everything I have come across and I am spending this entire week molding my business model and website around your ideas. I am hoping by 2018 I will be very well organized and set in my belief system of handling clientele, staging, and payments.
You have truly opened my eyes and I appreciate it..
Glad you found the site! Remember what works for me may not work 100% for you so don’t be afraid to change some things to better suit you!